

Buying Guide Fiat/Bertone X1/9

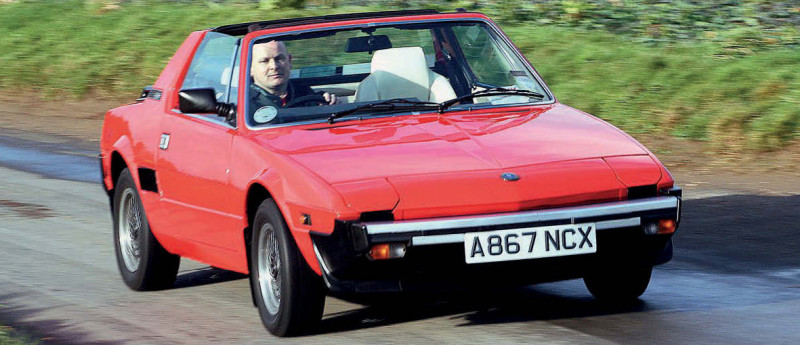
This lithe and nimble mid-engined sports car from the 1970s/1980s is now a credible and collectable classic. Discover the potential pitfalls, costs and problems when buying what was known as a baby Ferrari.
Report by ROB HAWKINS
Buying Guide The lithe and nimble Fiat/Bertone X1/9
If you are looking for a classic and practical mid-engined two-seater open-top sports car, then the Fiat X1/9 is worth considering alongside later alternatives such as the Toyota MR2, MGF/TF and Lotus Elise. Find a good one and you will be rewarded with impeccable handling and exhilarating performance, but do be aware that you will need to be constantly on the lookout for corrosion and meticulous with maintenance.
The X1/9 first appeared in 1969 as a concept car called the Autobianchi A112 Runabout. The body was designed by Marcello Gandini, who also designed the Lamborghini Miura, Countach and Diablo as well as the Lancia Stratos. It was manufactured by Bertone, leaving Fiat to fit its 75bhp, 1290cc, SOHC engine from the Fiat 128 and assemble the car at their Lingotto factory. Production didn’t get underway until 1972, and it wasn’t until 1977 that UK customers could buy a RHD model.
In 1978, the 1290cc engine was dropped in favour of a larger 85bhp, SOHC, 1498cc motor from the Fiat Strada, complete with a five-speed manual gearbox instead of the previous four-speed unit. In 1982, assembly was moved to Bertone and all cars became known as the Bertone X1/9, including the VS model with two-tone paintwork, alloy wheels, electric windows and leather seats. The last X1/9s, known as the Gran Finale, were sold during 1989 and 1990, closing out a total production run of around 170,000.
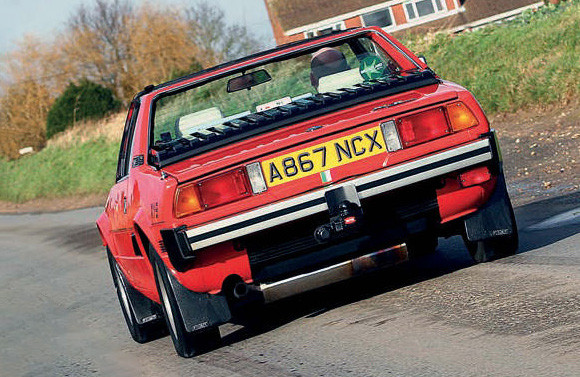
With a mid-mounted engine and compact dimensions, the X1/9 blew the small sports car competition away, making the likes of the MG Midget and Triumph Spitfire seem dated in both looks and performance. It was also designed with safety regulations in mind, particularly those that were emerging in the US where the X1/9 was intended to be sold. Consequently, the bodyshell features a roll bar in the C-pillar, front and rear crumple zones and a safety cage around the passenger compartment.
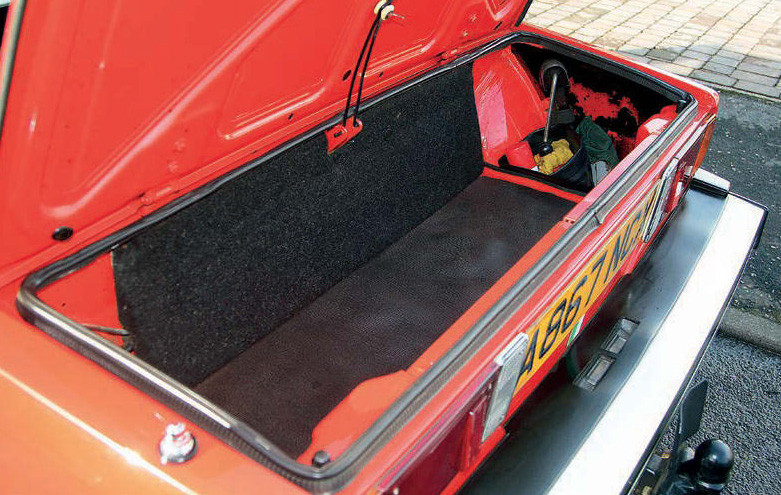
Practicality Weighing in at a mere 880- 920kg and with compact dimensions that are under four metres (12ft 6in) long and less than 1.6m wide (a little over five feet), the X1/9 is a small sports car to fit inside a garage and work around, requiring only an entry-level trolley jack to change a wheel or service the brakes. But for such a small car, it has been carefully designed to ensure a full-size spare wheel can be accommodated behind the driver’s (right side) seat, with the petrol tank squeezed into the adjacent side. Luggage is accommodated in the rear boot, and also the front compartment, although that’s partly used to store the removable Targa roof panel should you want some wind in your hair. But as Claire Whiting at Eurosport explains: ‘The roof storage is well designed so it only fits at the very top of the compartment, sliding under the nose cone and fitting over the battery/washer bottle. As such, it doesn’t really impact what’s in the main compartment.
We’ve had full camping gear and holiday luggage in the front with ease – just make sure the items at the top are soft! You can easily fit another two holdalls in the boot too.’
The X1/9 is a fun sports car to drive, but expect to be embarrassed by most modern diesel-engined family cars when it comes to straight line acceleration. With a 0-60mph time of 12.7 seconds from the early 1290cc (1300) engine and a slightly better 10.8 seconds from the 1498cc (1500), these figures were impressive when the X1/9 was new, but are slow by modern standards. Should you buy a US-imported model, then performance could be strangled with EGR valves and charcoal canisters (to feed petrol fumes from the tank into the engine). And note that US-bound cars employed Bosch K-Jetronic fuel injection from 1980 onwards.
Spares, tools and clubs
The availability of spares for the X1/9 isn’t as vast as many other sports car classics of this era, but parts suppliers in the UK include Eurosport UK, Middle Barton Garage, Ricambio, P1X 2000, X1/9 Spares and DG Rally Ltd. In the US, there’s Midwest- Bayless Italian Auto and Vick Autosports, and in mainland Europe there’s X19 Parts in the Netherlands. Rob Warren at the UK-based X1/9 Owners Club says that complete panels such as doors are no longer available (only reproduction skins and repair panels), along with interior trim, including the colourful seats and door cards from the Gran Finale.
Metric sockets and spanners are some of the basic tools needed to work on these vehicles, along with a timing strobe to check and adjust ignition timing. Special tools such as a wheel bearing puller that cost around £20 are essential should you need to change one of those. The drain plugs for the engine oil sump and gearbox (and its filler) need a 12mm hex/Allen key. Workshop manuals from the likes of Haynes and Brooklands are available for around £20- £25. The aforementioned Fiat X1/9 Owners Club caters for X1/9 owners in the UK and was formed in 1984. Membership costs £15-£25 per year and is recommended (the higher fee includes a monthly magazine).
Values
Restoration and abandoned projects generally cost from around £1500-£2000, whereas roadworthy examples start at around £7500, but can easily be double or even triple this amount for anything collectable such as an early 1300. If you are not bothered about the collectable models, then look for a late model that has the five-speed gearbox and larger 1498cc engine, which sell for up to £12,000 in original condition. ‘Very original pristine 1500s have sold for around £12k at UK auctions in the last couple of years,’ says Claire Whiting. ‘Ones that have been modified, such as 1500s fitted with 1300 quarter bumpers and non-original wheels, interior and paintwork really don’t come close, despite being tidy cars in their own right.’ There are more X1/9s for sale in countries outside the UK, particularly throughout mainland Europe. Providing you don’t mind the steering wheel being on the left, then it could be worth shopping around, but don’t forget that import duties may now need to be paid, you will have transport costs to cover and of course the vehicle will need to be registered in the UK, all adding to the cost.
Rust
Fiat’s poor reputation for corrosion didn’t escape the X1/9, despite corrosion protection improving in the mid-1980s when cathodic electrocoat primer was used along with PVC undercoating. However, Rob Warren at the X1/9 Owners Club warns: ‘There were tales of Bertone built cars being left outside at the factory, whereas the earlier Fiat-built X1/9s generally seem to be in better shape.’
Start your inspection at the front and carefully check around the nose cone, wings, wheelarches and bonnet. Open the front compartment to look inside for rust, especially inside the headlamp pod inspection panels and the bulkhead at the back. ‘It’s worth checking the condition of the floor under the rubber mat on early cars or the carpet on later models in the front compartment,’ explains Claire Whiting. ‘There are drain holes, but these can get blocked. The later carpet goes up the sides and hides the suspension reinforcement areas which rust from the outside in.’
Next in your inspection, move to the windscreen – which is bonded in place – and look for corrosion of the metal surround. Inside the cabin, the carpets should be fixed down, so feel for damp and look underneath the vehicle for corrosion. Check around the pedal box for leaks from the clutch and brake master cylinders. Remove the spare wheel (behind the driver’s seat on a RHD model) and check carefully for corrosion where water can get trapped (remove the inspection cover for the distributor and fuel pump to check the metalwork). There’s a petrol tank on the adjacent side, so any welding repairs in this area will require the tank to be removed. Rob Warren comments that the roll bar can become heavily corroded, which is a major structural part of the bodyshell.
Check along the door bottoms, up the A- and B-posts and back to the rear wheelarches before moving around to the rear to check everything from the boot and engine bay to the rear valance. ‘The rear arches have a double skin join at the edge with the inner arch and that is a rust hot spot,’ says Claire Whiting. ‘You’re more likely to find the curved rear lower corners are in need of TLC – what we call rear wing rear section panels. Also, check the door shut lines are true, and for any sagging when opened which may indicate problems with the A-pillar, hinges or door frame. The louvred engine covers are notorious for trapping water and can rust out at the edges.’ Empty the boot to check the floor area by unscrewing any fastenings for the floor base and removing all carpet if possible. Lastly, carefully check all suspension turrets from inside the front compartment and engine bay, which are known to corrode and are potentially complicated to repair and disastrous if not done correctly, leading to misaligned suspension geometry. Look underneath for other suspension mounting points and check these are intact and rust-free.
With new panels no longer being manufactured, several repair panels are available to help replace some corroded areas on the X1/9’s bodywork. Budget for around £90 for an outer wheelarch repair panel for example, £70 for a section of a wing (front or rear), £25- £40 for a door edge or skin repair section and £70-£90 for sill repair panels. There are also floor sections from around £87, boot floor repair panels from £47 and sections that go along the bottom of the windscreen priced from £50.
SOHC engine
Both the 1290cc and 1498cc engines used in the X1/9 consist of a single overhead camshaft configuration with a cast iron engine block, a five main-bearing crankshaft, an aluminium cylinder head and sump and a timing belt.

The engine should be suitable for unleaded petrol, and Fiat recommend the timing belt should be replaced every 36,000 miles or five years (no special tools are required to lock the camshaft and crankshaft).
With a front-mounted radiator and the engine behind the seats, coolant leaks can easily result in overheating, which in turn can cause head gasket failure, so examine what you can see of the coolant in the expansion tank (located in the engine bay) and inspect the radiator for leaks. Rob Warren says that having the radiator re-cored for around £250 helps to avoid or fix some of the cooling issues (a build-up of silt inside restricts its cooling performance), along with adding a manual override for the electric cooling fan that’s normally controlled automatically with a thermostatic switch.
Look for coolant leaks underneath the centreline of the vehicle, which is where two steel pipes transport the coolant between the radiator and engine. Unfortunately, they are routed through a centre tunnel, so they are largely concealed, which means that if they have corroded and are leaking, the tunnel needs to be cut open to access and replace or repair them. Look for grommets in the underside of the bodywork that provide access to this area to inspect the pipes. Corrosion of these pipes may not be the fault of road salt and poor-quality components, but expired antifreeze in the coolant – it should be drained and replenished every two years.
With the engine running, listen and feel around the short exhaust system for leaks. Parts are reasonably cheap, with a 1500 manifold for instance costing £140 and a full system (one silencer with some short pipes) at a little over £200. Also check any mounts and support brackets, some of which can be replaced for under £70.
The 1290cc engine should be equipped with a Weber 32DMTR carburettor, whereas the 1498cc engine has a Weber 34DATR. Overhaul kits are available for both and cost between £50 and £60, and Rob Warren says that a splutter in acceleration or the engine dying at idle will likely be blocked jets in the carburettor.
He not only recommends cleaning out the carburettor along with its idle and main jets, but to assume there’s also debris elsewhere that will block the fuel system. He advises owners to renew the fuel hoses (which can also break down internally and block themselves and the carb with pieces of rubber), add a filter before the carburettor and remove and clean out the fuel tank.
Listen for a rattly top end when the engine is running, which could mean the valve clearances need to be checked and their shims changed. A special tool, which costs £30, enables the shims to be changed without having to remove the camshaft.
Common oil leaks to look for are around the camshaft cover (gasket failure), between the engine and gearbox (rear main oil seal, which means the engine and ‘box have to be removed and separated) and via the driveshafts (new seals for a five-speed, or a new boot with seal on a four-speed). Claire Whiting says that oil can leak via the gasket between the camshaft housing tower and cylinder head and through the camshaft’s end seal. Replacing this seal and gasket would require the timing belt to be removed and thus changed.
Engine removal is best conducted from underneath the rear of the vehicle, providing the body can be raised high enough (a ramp or tall axle stands will help). If an engine needs a rebuild, then spares such as bearings, piston rings, thrust washers and gaskets are readily available and reasonably priced – a set of piston rings costs £74-£101, main bearings are around £35, big end bearings are under £30 and a 1500 gasket set with seals costs under £70. Budget for over £1000 for a DIY build that includes machine work on the head, cylinder bores and crankshaft.
Other engines
Several Fiat and non-Fiat engines have been fitted into the X1/9 by enthusiastic owners and specialists, ranging from the 1.4-litre from the Uno Turbo to the Honda K20 VTEC twin-cam. There are also a number of upgrades available for the standard 1290cc and 1498cc engines, including performance exhaust systems, electronic ignition, an electric fuel pump and fuel injection with a programmable ECU. The capacity of the 1498cc engine can be increased to 1900cc using a crankshaft from a Fiat Stilo which, according to Rob Warren, has the potential to produce 180bhp in naturally aspirated form.
Four- or five-speed
Parts availability for the rarer four-speed manual gearbox (as fitted to the 1300 model) are harder to find in some cases than those for the later five-speed manual gearbox fitted to the 1500. However, there appears to be a plentiful supply of most parts ranging from seals, selector forks and synchro rings to CV joints and clutch kits. If the clutch slips or the release bearing sounds noisy (but less noisy when the clutch pedal is pressed down), then budget for £90-£100 for a clutch kit consisting of a cover, friction plate and release bearing. The gearbox can be removed from underneath the vehicle without having to disturb the engine.
The clutch is hydraulically operated, with the clutch and brake master cylinders fitted onto the pedal box. The parts are cheap (budget for around £35 for a new master cylinder, less than £10 for a fluid reservoir and £20 for a slave cylinder), but they are awkward to access, as Rob Warren explains: ‘It’s worth changing both cylinders while you are there as it’s a difficult job because of the access. The steering column needs to come down and be moved to the side to lower the pedal box down. It’s also worth changing the heater valve while there is greater access with the pedal box out – the heater valve is connected to the heater matrix and an old valve could leak and scald your left foot.’
Check the selection of gears is smooth – the linkage consists of a single rod with an adjustable linkage, although Rob Warren says that later models had a lollipop type of linkage that can become detached, resulting in no reverse or fifth gear. If this happens, then a hole can be drilled through the linkage to secure it with a nut and bolt.
If there are any issues with the gearbox, then most specialists should be able to strip and rebuild it with new parts that are reasonably priced – a gasket set costs £28 and synchro rings are £60-£166. Look underneath the rear of the X1/9 for oil leaks from the gearbox and driveshafts. Inspect the corrugated rubber driveshaft and CV boots for splits and leaking grease – they generally cost under a tenner to replace, but if water and dirt has contaminated a 1500’s CV joint for instance, that may need replacing and costs around £40.
Suspension
MacPherson struts are fitted all round, with track control arms and radius arms at the front and adjustable toe links and swing arms at the rear. Visually inspect the coil springs for corrosion and fractures and the dampers for leaks (misting). A new strut minus the coil spring and mounts costs £105-£130, whereas a spring costs upwards of £50 each, although Claire Whiting remarks that they have never known the springs to break. AVO sell a complete coilover conversion kit for £800.
The balljoint on the end of each rear swing arm can fail, so first pinch its rubber dust cover to see if that has perished (if water and dirt get inside, this could result in premature wear). While a new dust cover costs less than a tenner, if there’s excessive play in the balljoint (detected by waggling a raised rear road wheel), a new section of the swing arm with a new balljoint costs £160 per side.
There’s also a balljoint on the end of the front track control arms, so inspect this as well – replacement track control arms cost around £100 each.
Steering
An unassisted rack-and-pinion system is used, which is mounted underneath the front compartment and accessed from underneath. Turn the steering from lock to lock while driving slowly to feel for slack in the system that denotes movement in the rack and track rod ends. New mounting bushes for the rack and new track rod ends are available, along with components to overhaul the rack and column such as seals, shims and bushes, ranging in price from a few quid to under £20.
Brakes
With 227mm-diameter solid discs all round, the dual-circuit braking system is non-servo-assisted. Typical problems include seized slider pins, resulting in uneven braking or dragging brakes, so measure the temperature of all brake discs after a test drive using an infrared thermometer. While driving, apply the brakes and check whether the car veers to one side. Any discrepancies could be caused by the aforementioned seized sliders (a result of a lack of routine maintenance), but also a seized piston or even a brake flexi-hose that has collapsed internally. Caliper repair kits can cost under a tenner, whereas a reconditioned caliper costs £70-£95. Components such as brake discs are around £20 each and pads from £12 a set. Check the operation of the mechanical handbrake, which locks the rear brakes and isn’t particularly efficient. If a vehicle is old enough to be MoT exempt, then the handbrake may not be working. Routine maintenance can improve it, but this may mean buying new handbrake cables and rear calipers.
Interior
Carefully inspect the upholstery, door cards, dashboard and all other interior trim for damage because if any of it needs replacing, it may be difficult to source. Check the door seals to ensure they are supple and not crushed – a new pair costs £160. Operate all the releases for the front compartment (bonnet), boot and engine cover. They are all cable operated and while each cable costs less than £20, they can be fiddly to replace and a nightmare if they have broken with the cover closed.
Electrical issues
Fiat and electrics don’t generally mix and have often been a bit of a joke, so test all electrical equipment to ensure it works. Poor earth connections and corrosion are often to blame for any problems, but don’t assume that if the headlights flicker, the indicators work when they feel like it and the cabin heater only blows at one speed that you’ll find a bad earth in a few minutes.
Our verdict
The Fiat X1/9 is a classic that needs to be carefully maintained and monitored to keep on top of all the potential issues that can arise, especially corrosion. But find one that has been looked after with this level of attention to detail, and providing you continue with this approach and invest the time and money required, then you should have a wonderful car that is rewarding to drive and an appreciating classic.
Thanks to: X1/9 Owners Club x1-9ownersclub.org.uk Eurosport (UK) 01379 679523 eurosport-uk.net
YOU MIGHT ALSO CONSIDER...
Classics Monthly editor Simon Goldsworthy and Senior Operations Manager at Lancaster Andrew Evanson each choose one car that they would recommend as an alternative
Simon Goldsworthy – Triumph TR7
Well, as a lifelong Triumph fan and former TR7 owner, I couldn’t really pick anything else, could I? The connection is in the wedge-shaped styling of course, although the actual driving experience is very different. The Triumph is a bigger car in every dimension and heavier too, so in standard trim it doesn’t feel quite as chuckable as the Fiat. There are plenty of upgrades to change all that though, plus of course the ever-present option of a V8 conversion to create a TR7V8. Done well, that creates a car which goes like stink, handles well and sounds absolutely glorious. Plus with the Triumph you get the option of a full convertible.
Andrew Evanson – Toyota MR2
I’ve gone the wedgie route too, though mine has the engine mounted amidships like the X1/9 rather than in the nose as per Simon’s TR7. It’s the first-generation cars from 1984-1989 that I have in mind, as they were smaller and lighter than subsequent versions. The handling was superb thanks to input from Lotus engineers, and with the 1587cc engine capable of pushing the MR2 from 0-60mph in around 8 seconds even in normally-aspirated form (a supercharged version was offered from 1986-1989), it is a true driver’s delight. There was a four-speed automatic option too if that is what you want or need.
Sample Prices
Some parts you can buy new, but sometimes secondhand will be the only option. At the time of writing, the following items for the Fiat X1/9 were all listed for sale on eBay:
- Rear suspension inserts (used) .................................£20.00
- Instrument cluster (used) ..........................................£48.50
- NSF indicator/sidelight unit (new)… £49.00
- Tandem brake fluid reservoir (new) ..........................£47.50
- Exhaust manifold (new)… £199.95
- Brake master cylinder (new) .....................................£33.00
- Full brake caliper set (recon) ...................................£250.00
- Rear light units – pair (used)… £135.00
ANDREW EVANSON
Senior Operations Manager at Lancaster Insurance Services, says:
With seating only for two lucky occupants, Fiat were able to squeeze plenty of personal space into a small overall package on their pretty X1/9, despite the mid-mounted engine. The result is a 24-carat classic that is easy to store, light and nimble to drive and capable of turning heads wherever you go. We often advise people to buy the best they can afford, and nowhere is this more true than with a Fiat of this era. Get it right and you’ll never stop grinning.
Quotation supplied by Lancaster Insurance Services lancasterinsurance.co.uk Tel: 01480 809176
INSURANCE QUOTE
1986 Fiat/Bertone X1/9 worth £11,950
Standard quote: £89.97, or £107.97 with Agreed Value.
Quotes based on a 45-year old marketing manager, access to another car, no claims or convictions, club member, 3000 miles per year, no modifications, living in SP2 0HL. Disclaimer: Subject to underwriting criteria. An additional charge may be payable. Authorised and regulated by the Financial Conduct Authority.